Building your First Level
with UnrealEd 3.0:
The First Room, Part I
NOTE: If you haven't already, it's adviseable that you read Basics of this tutorial as it covers some of the basic concepts related to UnrealEd 3.0.
So, let's get started, shall we?
First off, if you haven't already, open up UnrealEd 3.0 by clicking on Start, going to your Unreal Tournament 2003 group, and clicking on UT2003 Editor. This will bring up the interface as described in Part I of this tutorial. You'll also notice that the browsers window is already open for you. For now, you can close this or minimize it.
| Let's take a moment to familiarize you with navigating in UnrealEd. As expected movement in each of the viewports is done with the mouse, along with various combinations of keys and the left or right mouse buttons (hereafter listed as LMB for Left Mouse Button and RMB for Right Mouse Button). It may feel a little cumbersome at first, but after some practice, it easily become second nature. To move your camera in the Perspective view port—the black viewport with the blue lines—click and hold the LMB and move your mouse backward to forward and left to right. As you can see, the view moves along with your mouse on the X and Y plane. That is, you can look left to right or move forward and backward. Now, hold down the RMB and move your mouse. This allows the camera to look left and right and up and down, while remaining stationary. |
|

Finally, hold down both the LMB and RMB and move your mouse. Moving left and right moves the camera side to side on the same track. Forward and Backward moves the camera on the Z-axis, that is, you can move up and down.
Movement in any of the orthographic views is accomplished in the same way except that if you hold down either mouse button, you can only move from side to side. Holding down both mouse buttons allows you to zoom in closer, which can also be accomplised with the mouse wheel.
Let's start by building an initial room for your level. There are a few things to keep in mind as you're deciding what size to make your initial room. First off, a room that is only 128 Unreal Units (UU) both in height and width is comfortable for a player to run through, but it doesn't leave a lot of room for jumping, especially with the new power jump feature in the game. A room that has a height of 256 is comfortable both for the player to run through and also for the power jump feature. Also, it is very important to note that the editor, and as such, the game, prefers even numbered dimensions. Said another way, you'll keep both yourself and the editor happy if you choose dimensions in powers of 2. For an excellent quick reference that lists the most widely used dimensions, check out Firefly's Number Chart.
 Another
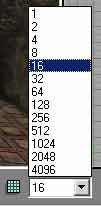
important note is that 1 UU = 16. That is, if you have your grid
set at 16 as in the picture—found at the bottom of your screen
just under the perspective view—a cube setting of 16 x 16 x16
will build a cube that is one unit in width, height, and breadth.
You'll notice that you can set your grid as low as 1 or as high
as 4096. Lower settings than 16 are most often used when trying
to place decorations or fine-tuning your geometry, and the higher
settings are rarely used. For our purposes, unless otherwise noted,
keep your grid set at 16.
Another
important note is that 1 UU = 16. That is, if you have your grid
set at 16 as in the picture—found at the bottom of your screen
just under the perspective view—a cube setting of 16 x 16 x16
will build a cube that is one unit in width, height, and breadth.
You'll notice that you can set your grid as low as 1 or as high
as 4096. Lower settings than 16 are most often used when trying
to place decorations or fine-tuning your geometry, and the higher
settings are rarely used. For our purposes, unless otherwise noted,
keep your grid set at 16.
For our level, let's choos a room with a Height of
256, a Width of 512, and a Breadth of 512. Right-click on the cube
button—![]() —to
call up the properties for a cube primitive.
—to
call up the properties for a cube primitive.
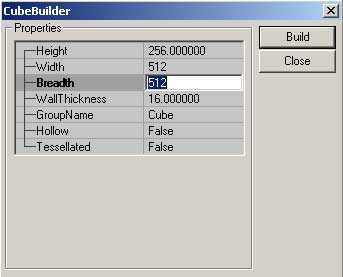 Click
on the dimension numbers in the row labeled Width, and enter a
dimension of
Click
on the dimension numbers in the row labeled Width, and enter a
dimension of 512.- Click on the dimension number labeled Breadth and enter a dimension
of
512. - Now, click on the Build button.
You'll notice that once you clicked on Build, a red cube appeared in each of your orthographic views. To make it visible in your perspective view, simply click on the Perspective viewport.
You'll also notice that the cube you set up has no
solidity. That is, in the Perspective view, it's simply a wire-frame
representation of the cube. In order for the cube to actually become
solid geometry, click on the Subtract button—![]()
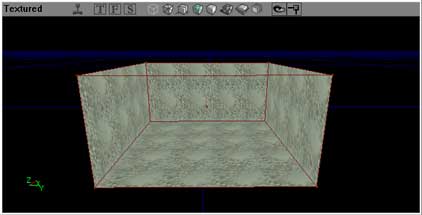 Now,
what you should see in your Perspective viewport is a hollowed out
cube with a green, bubbly texture on the walls. This texture is
the default texture, and should be changed, otherwise the editor
will issue a warning when you hit the Build All button on
the toolbar at the top of the screen.
Now,
what you should see in your Perspective viewport is a hollowed out
cube with a green, bubbly texture on the walls. This texture is
the default texture, and should be changed, otherwise the editor
will issue a warning when you hit the Build All button on
the toolbar at the top of the screen.
So, with that in mind, let's change the default texture to one that's appropriate for the floor, the walls, and the ceiling.
- First off, let's move the Red Builder Brush out of the way by clicking on it in any one of the viewports. It should turn from a dull red to a bright red to indicate that it's the currently selected object.
- Position your mouse in the Top viewport—it doesn't really matter where, though it's helpful if you position it somewhere on the Red Builder Brush.
- Press and hold the [CTRL] + LMB and move to the right. This will move the Red Builder brush to the right.
The above method is how you effectively tell the editor to grab whatever object is selected and move it from one position to another.
In order to texture the cube we just subtracted, we need to be able to see all six walls of the cube.
 |
|

Now that you have your first room built and textured, you'll notice that the textures appear too large. That is because the textures I chose were built at 1024 x 1024, meaning they would fit perfectly on a wall that was the same dimensions. That doesn't mean we have to simply live with these textures. We can resize the textures so they fit the walls of the room.
With this build of UnrealEd, resizing the textures to fit simple faces is made very easy.
 Pick
any wall of your room so that it is highlighted.
Pick
any wall of your room so that it is highlighted.- Press [Shift] + B to select all the walls of your room.
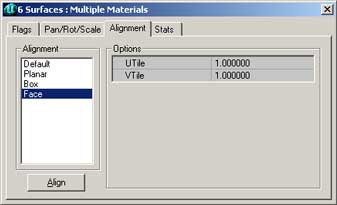
- Right-click on any of the selected walls to bring up the Right-click menu and select Surface Properties at the top of the menu. The initial tab is Flags.
- Click on the Alignment tab.
- Highlight Face in the selection box and click on Align.
You will notice that this automatically sizes the textures you chose to fit each of the six faces of your room, as in the picture below.

At last, your first room. It's a pretty basic room, but this process is essentially the same that you'll use with any BSP based geometry.
Adding Lights and a Player Start to your Room
Now that you have the geometry and textures for your first room, you need to add a few more elements to make it a playable room.
To start, your players need to be able to see, so let's add a light to your room. The room is small enough that one light should suffice if properly placed.
 Start
by positioning your Perspective viewport so that you can see the
ceiling of your room.
Start
by positioning your Perspective viewport so that you can see the
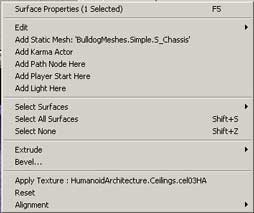
ceiling of your room.- Right-click at about the center point of the ceiling and call up the Right-click menu.
- Click on Add Light Here. A lightbulb icon will appear in your room to indicate that a light is present.
- You may have noticed that not much has changed yet in your viewport.
You need to build the lighting in order for the changes to take
effect. Click on the Build Lighting button.

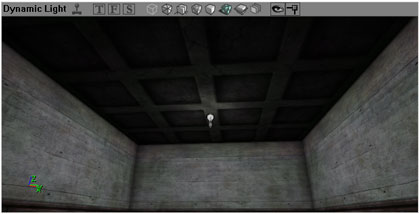
- If you still don't see any changes, you probably need to turn on the Dynamic Light button on your Perspective viewport, highlighted green in the picture below.
![]()
Your lit room should look similar to the picture below.
 Even
though there's a light in the room, there's still a minor problem
with the lighting. Essentially, some of the light is absorbed by
the proximity of the light to the ceiling. For it to light the room
more effectively, highlight the light to select it and use the [CTRL]
+ LMB drag method in the Side viewport to move the light
down to about the middle of the room, and rebuild the lighting.
Now, the room appears a little brighter, and the texture on the
ceiling is more visible.
Even
though there's a light in the room, there's still a minor problem
with the lighting. Essentially, some of the light is absorbed by
the proximity of the light to the ceiling. For it to light the room
more effectively, highlight the light to select it and use the [CTRL]
+ LMB drag method in the Side viewport to move the light
down to about the middle of the room, and rebuild the lighting.
Now, the room appears a little brighter, and the texture on the
ceiling is more visible.
The light you just placed very likely won't be the final light placement for your room, but it's good to get into the habit of placing placeholder lights so you can view your level in Dynamic Lighting mode, and to get a feel for how it will look in the end.
 Finally,
to test your room in the game, you need to tell the editor where
to start the player.
Finally,
to test your room in the game, you need to tell the editor where
to start the player.
- Right-click on the floor of your room, somewhere near a corner. Clicking on the floor will ensure that the player start is located at the correct height from the floor and keep the player from starting the game either too high off the ground or buried in the floor..
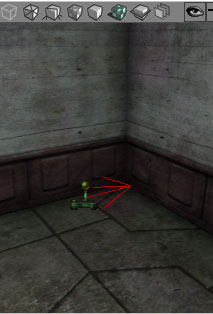
- On the resulting menu, click on Add Player Start Here. A joystick icon will appear with an arrow pointing in the direction the player will face when spawned.
- With the player start still highlighted, position the mouse pointer anywhere in the Top viewport.
- Press [CTRL] + RMB and move the mouse. This will rotate the player start.
- Rotate the player start until it is facing into the room.
- Click on the Build All
 button to apply all the changes to your level.
To give your new room a whirl in the game, click on the Play Map button found at the top of the editor screen, next to the Build Buttons.
You'll see that the room you just created is very simple and rather featureless. In the next tutorial we will cover expanding the room by adding hallways and additional rooms as well as adding static meshes.