Building your First Level
with UnrealEd 3.0
Expanding your Room
and Aligning Textures, Part II
So, your first room should look similar to the picture below:
 As
mentioned in the last tutorial, it's pretty basic and featureless,
and all in all, it's a pretty boring level. In the immortal words
of Martha and the Vandellas, Nowhere to run to, no where to
hide.
As
mentioned in the last tutorial, it's pretty basic and featureless,
and all in all, it's a pretty boring level. In the immortal words
of Martha and the Vandellas, Nowhere to run to, no where to
hide.
Let's do a few things to expand this level and add a little more room to run around in.
1. Place your Red Builder Brush in a position like in the picture to the left in theTop viewport. If your grid size is set at 16 as suggested in the previous tutorial, your Builder Brush should be two major gridlines apart (the darker lines on the grid).
Important Note: Since we're going to be doing
a lot of moving of brushes, make sure you have your Vertex Snap
Toggle ![]() turned on. It's located at the bottom of the screen in UnrealEd,
just under the Perspective view. This will ensure that every brush
you move lines up perfectly with the grid. Leaving this off could
result in errors later.
turned on. It's located at the bottom of the screen in UnrealEd,
just under the Perspective view. This will ensure that every brush
you move lines up perfectly with the grid. Leaving this off could
result in errors later.
2. The Red Builder Brush should still be at the dimensions set in the previous tutorials. If it's not, right-click on the Cube button in the standard primitives to call up the Cube Builder dialog. Enter in the dimensions of 256 Height x 512 Width x 512 Breadth and click on Build.
| Tip! If you make a mistake, don't worry. UnrealEd is pretty forgiving. Simply click on the brush that turned out wrong to highlight it—it'll turn brighter (yellow if subtracted, blue if added, green if a portal, etc.)—and hit Delete on your keyboard. The selected brush will disappear in your orthographic views, but it will still show as a textured room in your Perspective view. To show the updated deletion in the perspective view, click on Build or Build All. |
3. Subtract your second room from the world space. You'll notice that once it's subtracted, your new room is all one texture. This is the last texture you selected in the Texture Browser or the default, green and bubbly texture if you're starting from a fresh start with the editor. But, to keep with the theme, we want it to look like the first room we created. So, open up the Texture Browser and add the textures you chose for your previous room to the walls, floor and ceiling. Again, these textures will need to be resized to fit the dimensions of your new room, so click on any of the 6 sides in the new room to highlight it, and press [Shift] + B to select all the faces in your new room. Now, instead of right-clicking on one of the selected faces to call up the surface properties window, we're going to take a shortcut. With all the faces still selected, simply press F5 on your keyboard. This will open the surface properties dialog. |
4. Go to the Alignment tab and align all the textures using the Face option in the selection box. Once you click on Align, your new added room should look like the picture below.

Now that we have two rooms in our level, we need a hallway to connect the rooms, otherwise they're not of much use. Hallways are created in much the same manner outlined above when we created the rooms. There is one point worth mentioning here, however. Whenever you connect the Red Builder brush to a subtracted cube and press the Subtract button, where the cubes meet, that space will be subtracted as well. Let's create the hallway to better show what this means.
-
 Define
a cube that is 256 Height x 256 Width x 256 Breadth.
Define
a cube that is 256 Height x 256 Width x 256 Breadth. -
Place the cube so that it is touching both rooms in your level, and so that it is aligned with one of the walls as in the picture. It should fit perfectly.
-
Press the Subtract button. As described above, where the cubes touch, the space is subtracted, allowing you to connect the rooms with the hallway.
Again, your hallway needs to be textured, but instead of opening up the Texture Browser as we did before, let's take a shortcut.
-
Press and hold the [ALT] key while single-clicking with the RMB on a texture in one of the rooms you already created. Make sure it's a texture other than the one already in the hallway. This will make the texture you clicked on the active texture.
-
While still holding the [ALT] key, LMB click in your hallway where you want the texture to appear. It should show up, but UnrealEd can be a little stubborn on occasion, and it might take a couple of tries. If it doesn't show up the first time, try again from step 1.
-
Finally, highlight a texture in your hallway and call up the Surface Properties window by either pressing F5 or using the Right-click menu. Size the textures to the faces of your cube by using the Face option.
 When
you resized the textures in your hallway, you may have noticed a
little problem with the texturing. It appears too small, and the
walls are all facing the wrong way. This is because the Face
option in the texture alignment options simply resizes the texture
to match the face of the brush you created.
When
you resized the textures in your hallway, you may have noticed a
little problem with the texturing. It appears too small, and the
walls are all facing the wrong way. This is because the Face
option in the texture alignment options simply resizes the texture
to match the face of the brush you created.
So, let's fix it.
The steps listed below are assuming you chose the textures exactly as I did from the HumanoidArchitecture package as the texture for your walls. Other textures may have similar problems and might require a few more steps to correct. If you'd like to change your textures to match those in the picture, the textures I chose are as follows: Walls: wal01bHA; Floors: flr04HA; and Ceiling: cel03HA.
- First we need to reset the texturing back to the default value by selecting all the faces on the brush using the [Shift] + B option. Open up the Surface Properties dialog box if it isn't open already, click on Default, and press Align. You'll notice that the textures all return to the same size as when you first created the hallway.
 We'll
have to correct each face of the cube individually, so click somewhere
in the hallway to deselect the faces.
We'll
have to correct each face of the cube individually, so click somewhere
in the hallway to deselect the faces.- Starting with the floor of the hallway, click on it to highlight it.
- In the Surface Properties window, open up the Pan/Rot/Scale tab. In this window you are give a number of options that give you more direct control of the position, size and rotation of your textures.
- The floor of your hallway is easily fixed by setting the Simple scaling to .5 as shown in the figure to the right. With the floor still highlighted, click on the Simple Scaling dropdown box and choose .5, then click on Apply. The floor should align perfectly.
The walls, on the other hand, are going to take a little closer manipulation. For this, we need to adjust the U and V directly by entering in the numbers for each dimension.
There are a couple terms you should be familiar with before we continue. UVW in 3D art refers to the placement of a texture or material on a plane. UVW is not an acronym for anything, rather it is only used to avoid confusion with XYZ, which indicates length, width, and height in the geometry. For the purposes of UnrealEd, U refers to a texture's position on the U axis (X axis), and V refers to the position on V axis (Y axis).
Moving on:
- Position the camera so that it is facing the wall that is aligned with the walls of your rooms—if you're looking at the Top view, it'll be the wall on the bottom. You should be able to see the texturing in both rooms as well as the misaligned hallway wall texture.
- Select the wall texture, and enter in the values for U and V as in the picture below—.49 for U, and .25 for V. Note: There is really no way to know what numbers to enter into this window. It's a matter of trial and error.
 |
For the most part, the texture looks all right. It's the same size as the one in the rooms, and you might be tempted to just leave it as it is. However, if you look closely, you'll see there are still a couple of issues we need to tackle with this texture before moving on. |
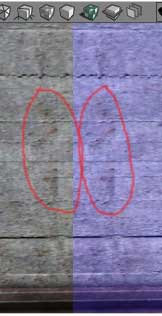
It's a good habit to get into to check your texturing very closely so you can catch little problems that might destroy some of the realism of your game world. In order to test if your texturing is lined up correctly, look for repeating patterns on the texture itself. For instance, take a close look at the two pictures below.

![]()

I've circled the problem indicators. In the first picture, there's a repeat in the texture pattern that indicates the texture is flipped in the wrong direction. Notice how the three areas I circled are the reverse of one another. In the second picture, there's a visible seam between the textures that will also show up in the game. Both of these texture problems destroy the quality of your level and serve to remind the player that she's only playing a game.
- To fix the first problem of texture flipping, highlight the texure on the hallway wall.
- In the Surface Properties window, with the Pan/Rot/Scale tab active, click on Flip U on the Rotation subbox. This will get your hallway texture facing the right direction.
- Move in closer to where the hallway texture meets the room on the left of where your camera is facing.
- There's still a minor little seam on this side of the hallway, so click on Pan U 1 twice.
Now, the texture should line up perfectly on that side of the hallway. But, if you move to the other problem with the texture seam noted in the second picture above, the seam is still visible. To fix this, we're going to leave the hallway texture alone and pan the texture in the second room we created. We're also going to use a new tool in the toolset, the Texture Pan tool.
The Texture Pan ![]() tool is a handy way to quickly pan your textures into place.
This tool, and it's partner, the Texture Rotate tool work
in much the same way as the others. With this tool, using [CTRL]
+ LMB moves the texture along the U axis (left and right), and
using [CTRL] + RMB moves the texture along the V axis (up
and down).
tool is a handy way to quickly pan your textures into place.
This tool, and it's partner, the Texture Rotate tool work
in much the same way as the others. With this tool, using [CTRL]
+ LMB moves the texture along the U axis (left and right), and
using [CTRL] + RMB moves the texture along the V axis (up
and down).
 Click
on the Texture Pan tool to activate it. Your cursor should
change to look like 4 arrows pointing in opposite directions.
Click
on the Texture Pan tool to activate it. Your cursor should
change to look like 4 arrows pointing in opposite directions.- Highlight the wall texture of the second room you created to activate it.
- With the Texture Pan tool, press [CTRL] + LMB and drag the texture until you see a repeating pattern in the textures as indicated in the picture to the right. This is what you'll use to know when to slow down the panning.
- Continue to move the texture until it lines up correctly. You may want to move in closer to ensure there is still no visible seam.
If you zoom out with the camera, your wall should be perfectly matched. But, don't forget we still have one last wall in the hallway to fix. However, this is easily done by simply highlighting it and checking to ensure the numbers you entered into the scaling box—.49 for U and .25 for V—are still ready. Then click Apply. The wall should look fine, though you may wish to move the texture so it's centered a little better, though it's not necessary.
Now, add a light to your second room and click Build All. If you want, go ahead and test your level in the game to see how it looks. Also use this in-game test to double-check your texturing to catch any problems before we move on.
Again, don't forget to save your level. It's a good idea to get into the habit of saving your level at various stages throughout its creation, and to save it under different file names. For instance, in the last tutorial, we named our map tutorial_map, so for this version, let's save it as tutorial_map2. Saving your map with different file names at various times could save you a lot of heartache. If something unforseeable should happen, such as your save file corrupting or some other unspeakable glitch, all you have to do is revert to your last saved version and begin your rebuild from there.
Moving Forward
Originally I'd planned to add more to this part of the tutorial, but considering the amount of information covered, it's probably best to leave it here and give you a moment to digest the information. In the next tutorial, we'll discuss expanding your level further to include Z-axis, stairs, and adding static meshes.